This blog is no longer active. All content from this blog has been moved to my new website: LoriDanelle.com. To view this post on the new site, click here.
*********************************************************************************************So I thought I'd share with you how I made Little Sister's toddler pallet bed, because I know you're staking out dumpsters at warehouses and such, trying to get your hands on a couple of pallets so you can make a bed of your own. Right? OK, maybe not that desperate, but still, you're curious. :)
Plus, this will save you from half a dozen trips to Home Depot throughout the duration of the project for supplies you had no idea you needed. ( no, I'm not speaking from experience. . .OK, OK, maybe I did take 5 trips. )
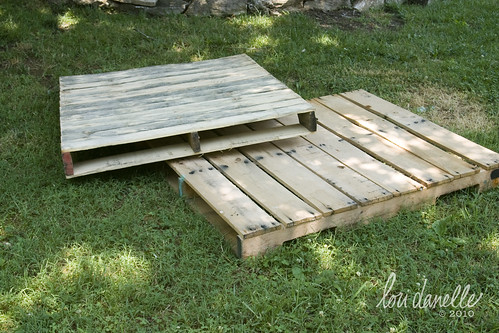
To start you'll need at least 2 pallets, 3 if you're going to need to do any repairs to your pallet — and spare parts are never a bad thing.
The ones I used were 48 x 40 inches and had the slats pretty close together, which is how I achieved the head & foot board. Also, the 40" worked perfectly for a toddler bed, which you'll find out why in a moment.
You will also need:
• 4 – 5 bolts, (long enough to go through 2 widths of bracing when butted up next to each other) washers & nuts
• short wood screws (long enough to go through the slats & into the next board, but not through)
• long wood screws (long enough to go through the bracing and into the next board, but not through)
• one 2x4x10 piece of lumber (longer or more pieces if you need to make any modifications due to different pallet size)
• 5 casters with locks
• palm sander with medium grit sandpaper
• circular saw
• drill w/ bits in sizes for your bolts and potentially the screws, depending on age of pallet, condition of the wood & how prone the wood is to splitting
• socket set
• tape measure
• pencil :)
• T-square
****the following could come in handy, but may not be necessary, depending on placement of slats & nails****
• hand saw
• sawsall with blade for metal
Have everything??? OK! We're ready to start!!
(please keep in mind that no two pallets are going to be exactly the same. use these instructions as guidelines, and make adjustments where needed.
Also, I will be referring to the top and bottom boards as "slats" & the 3 center boards as "bracing" so we don't have any confusion)

With your palm sander, sand down all the surfaces to keep your little one from getting splinters. I didn't have to sand a whole lot, just got rid of the rough wood, but kept the character. (Once it was built I did go back and sand portions that would be touched often and thus needed a little more caution)
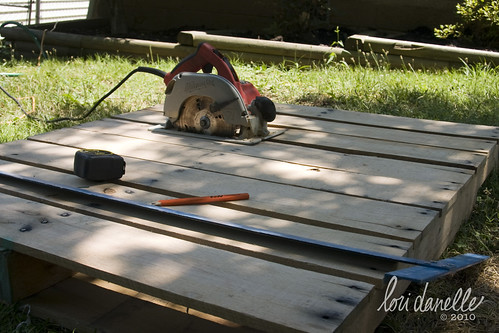
Toddler mattresses are generally 28" wide. So, to start with, using a circular saw, I cut both pallets to 29", cutting ACROSS the bracing, not with it. That gave me two pallets 29" x 40".
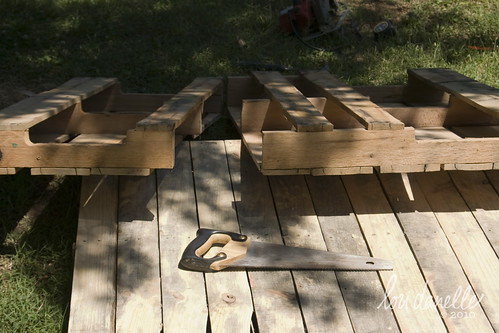
You will have to cut one side of the pallet, then turn it over and cut the other side of slats, as well as each brace from the side. The middle one can be tricky which is where a hand saw can be useful. Also, if you find some nails in your way, a sawsall with a blade for metal, may just be your best friend.
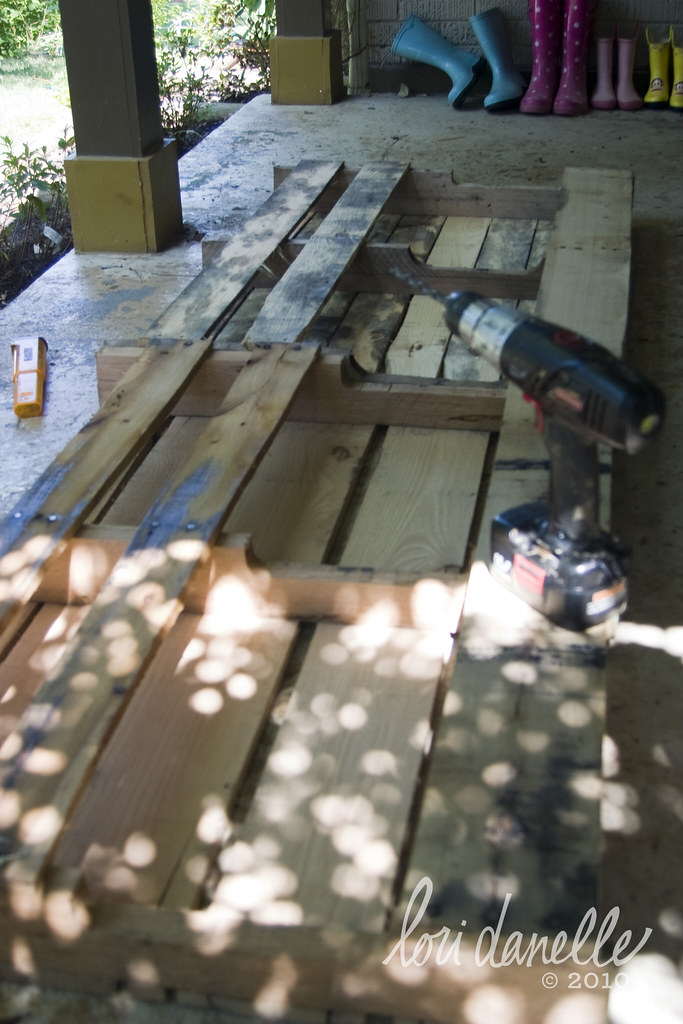
On a flat surface, lay both 20" x 40" small pallets up-side-down, butting up the edge bracings, matching edges as best you can.
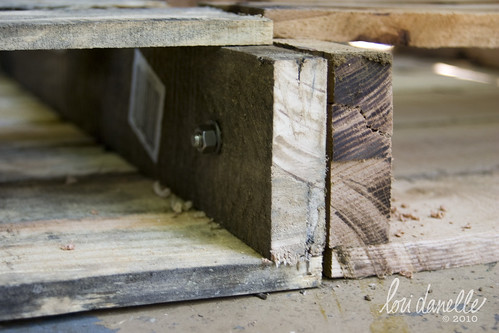
With the drill, drill pilot holes for your bolts through the entire depth of both bracings (clamp together, if needed, to ensure alignment). Put in the bolts and tighten the washers & nuts with a socket set.
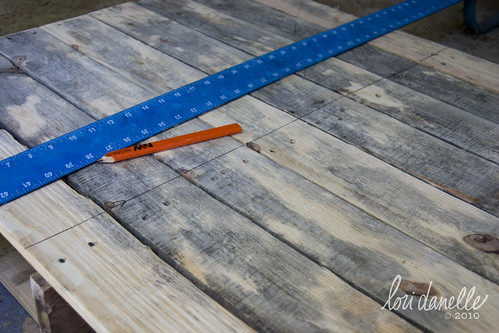
A typical toddler mattress is 52" long. My pallets were 4.5" tall. So, I then drew a line on the connected pallets at 61" (52 + 4.5 +4.5).
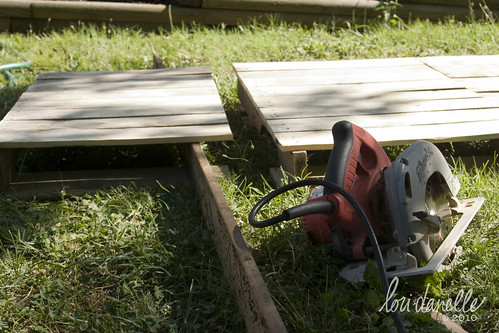
Cut with a circular saw. I found it worked a lot better to place a board under the slats I was cutting to help stabilize them and keep them from drooping after being cut and putting tension on the saw blade.
You might notice that cutting at 61" puts me just about an inch past the middle brace of the pallet. This is perfect for my toddler bed! If however, your cut has to go on the other side of the brace, you will need to reinforce the slats by screwing/nailing a 2x4 (or whatever size is appropriate to your pallet) inside the end of those slats.

Flip the pallet over and attach your casters at each corner and one in the middle where the 2 pallets come together. If your screws will be close to the edge of a board, or the boards are prone to splitting, drilling pilots will help alleviate splitting. Of course, good help is always welcome. :)
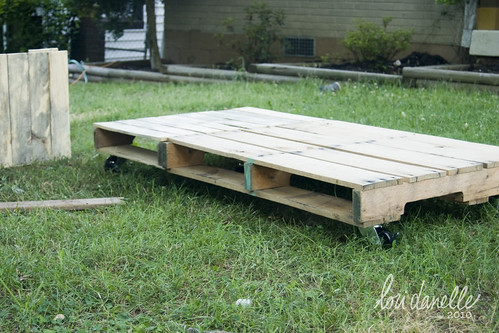
Flip the thing over and Whoo-Hoo!! You're almost there!!
Next step, head & foot boards.
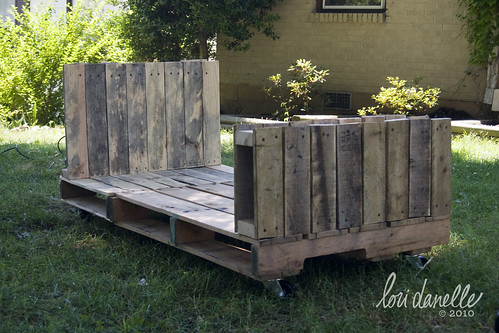
Using the 29" wide section that you cut off from the connected pallets, flip is up on end, so that the bracing sits on the edge of the bed. Drill pilots holes, then screw into place. Cut a section of 2x4 to stabilize the slats and screw in place a few inches from the top of the slats.
For the foot board, cut two sections from the 2x4, 29" long. From the remaining parts of the pallet, cut the slats into 12" sections and then screw/nail them to the 2x4s on ONE side, aligning with the bottom. Then flip this up on end and place on the end of the bed, leaving space for the final row of slats from the very edge of the bed. Drill pilot holes, then screw in place. Screw/nail the other 2x4 to the slats a couple of inches from the top. (If you do this step sooner, you will need a 90 degree drill in order to be able to screw it in place)
Attach the slats to the other side of the 2x4s.
If adding side rails, repeat the steps for the foot board, cutting your 2x4 to the desired length & only attaching slats to one side. Run a 1x4 across the top to stabilize. Then screw into the pallet. You may need an extra pallet for this step, depending on the type/size of pallet you use.

And there you have it!! One ridiculously cute bed for well under $100!!
If anyone gives this a try, please send pictures!! I'd love to see your interpretations! And let me know if any of the steps don't make sense. I'll try to clear it up for you!!
Enjoy & Happy Building!!
xoxo—Lori Danelle
I also have plans of making another one for Big, as she requested. Hoping to get my hands on more pallets this week & built next weekend, so I'll have pictures for you as soon as I can. We'll see if my instructions change any if I get pallets that are a little bit different. I'm crossing my fingers that they'll be the same — I've already got this way figured out!!
If you haven't already, be sure to check out the latest installment of Preschoolers 101 over at Southern Institute for Domestic Arts & Crafts!! Today Heather is talking about little one's emotions! Good stuff!!
**********************************************************************
Any comments that are overly critical and/or mean will be deleted. I've read my share of negative comments on various blogs where this bed has been featured and don't need them here. I would never go to your personal space and make rude or judgmental comments about something of yours. I expect the same courtesy while you are here.
You do not have to agree with me or like the things I do, but if you choose to voice your opinion, please keep it respectful. If the only way you feel comfortable leaving a comment is by leaving it anonymously, then perhaps you should think twice about leaving it in the first place.
Lori Danelle
OMG! can't wait to show this tutorial to my hubby ;) it is really amazing that you do it all yourself! again, it turned out fabulous and I can't wait to see a big one!
ReplyDeleteSo if I ever need one of these beds I think I'll just have you make one for me, Ms Handy!
ReplyDeleteDid you do anything to treat them for potential chemicals in the pallet and off-gassing?
ReplyDeleteThese pallets were heat treated rather than chemical treated so this was not necessary. But good question!
ReplyDeleteAMAZING! This looks so good! I don't have a little one I could make this for but maybe my 60 pound lap dog Nathan would like one ;)
ReplyDeleteOh the pallet bed is so beautiful!
ReplyDeleteCongratulations on your work, and the pictures are very nice too.
Follwing you right now.
Green kisses
I want to have a kid JUST so I can make one of these.
ReplyDeleteOk, I'm only 95% serious.
But for real, I'm excited to see how this can be varied. SO creative!
Really great, and congrats on getting posted on Design Sponge! I'd love it if you'd drop by my crafty blog linking party on Sunday (thru Tues) and link to this so I can share it with my readers! Plus there's a lot going on on my blog I think you'll like! All the best!
ReplyDeleteIncredibly original and well done. Love it.
ReplyDeleteOmigoodness. You read my mind! My toddler just climbed out of his crib two weeks ago and we've been debating on whether or not to buy a bed. In the mean time he is on a mattress on the floor. I love pallet recycling.
ReplyDeleteWonderful! Thank you for this great post. We will be sure to send you pics!
Congratulations!
ReplyDeleteCool recycled bed!! Really love it.
I share it in my Inspiration Label ;)
oh my goodness...that's the cutest bed i've ever seen! it might be time to go dumpster hunting!
ReplyDeletewhat a gorgeous blog you have! i found you through the southern institute :)
and thanks for the shout out!
This is the mot beautiful bed I have ever seen. Do you think this can be made into a double bed? I want to make one!
ReplyDeleteI loooooooove this idea and have two two year olds in desparate need of a different sleeping situation. Tempting, very tempting.
ReplyDeleteAre all pallets heat treated and chemical free or is that something you have to figure out? If so, how do you tell?
I just saw this bed over at Baby Space Kids and I think it's incredible! I love that rustic look!! Talk about talented.. thanks for sharing with us! You've got 2 little cuties there..
ReplyDelete(I'm also in love with the 2 dressers as well).
I love this bed... it is absolutely awesome... I love the rustic look...
ReplyDeleteI would love details on the bedding as well... do I see some anna maria horner fabric or is it just my imagination? VERY CUTE!
ReplyDeleteveggie wedgie, I think it's completely possible, you just may want to brace it differently underneath. Not sure I would trust bolts & a 5th wheel to anything beyond a toddler bed.
ReplyDeleteKristin, I did a post on this topic, so check out my newer posts to get all that I know! :)
Chantale, thanks for the compliment on the dressers. I just happen to love them as well! They were my husband's when he was a boy and they looked sad, sad, sad. So I spruced them up just and tad and now would have a hard time getting rid of them for any amount of money! I believe I did a post on them as well at some point.
This is such a great idea. I love the rustic look. My only hesitation in not doing it this weekend is "how do you know if the wood has been treated with some nasty preservative or been in contact with some kind of "spray" in the shipping process. This has been my inpiration for the week!
ReplyDeletemymommymakesit
Wow! This is absolutely amazing! You’ve got a great blog and I think you’d be interested in mine. I’d love it if you’d link up to my Tot Tuesdays party- a linky party dedicated to all things toddler: http://www.mydeliciousambiguity.com/ Have a great day!
ReplyDeleteThis bed looks so cute, but it's also so incredibly dangerous... Wooden pallets, even heat-treated ones, contain massive amounts of formaldehyde. Not to mention that the slightest spark of anything (from an electrical outlet in the room, or a falling spark from anything you can imagine, or a candle) will send this bed up in flames. Wooden pallets are notoriously easy to catch on fire, more so than 'proper' kids' bedroom furniture.
ReplyDeletePallets only offgas formaldehyde if they're made with engineered wood (like pressed wood or plywood). I see no such product in the pallets she is using.
ReplyDeleteYes, they're pretty flammable. But so is a whole lot of other stuff in the typical house, unless it's treated with fire retardant - which can bring problems of its own.
There should NOT BE ANY flames near a toddler's bed, and if an electrical outlet sparks, you've got bigger problems than those pallets, believe me. I've burned pallets on trash piles, and I've never been able to light one with a Bic.
You should have painted it or stained it or put a pr0tective coating on it so that your little girl doesn't get wood splinters.Still looks a little stained. :0(
ReplyDeleteThank you for your concern, but I can assure that it is well sanded and will not be giving her any splinters.
ReplyDeleteI understand that this isn't everyone's style, but everyone at my house LOVES these beds. A perfectly matching Pottery Barn style room just isn't us.
This is wonderful! Great job!
ReplyDeleteNice idea and great bed.
ReplyDeleteBut I agree with several of the above comments, be careful and know the source of your pallet. Since pallets are a business expense, companies recycle,repair and reuse them. Rather than digging through dumpters, ask the business owner, or find a local pallet manufacturer and buy a new, unused one.
A good sanding and several coats of polyurethane is a must.
David, I agree. Knowing the source of your pallet definitely helped me be confident that I was not putting my kids at any sort of risk. I was able to get my pallets through the company I work for, so I know exactly was has been on them. Plus the warehouse manager is a very good friend of mine, so he was able to help me select the best ones for my project. In addition, he keeps all the pallets in the warehouse chemical free for the same reason people have been concerned with making a bed out of chemically treated pallets. Just as they're not good for toddlers, chemicals aren't good for warehouse workers either!
ReplyDeleteAs for the sanding, though they still look rough because they have been heavily used, I can assure everyone that I was very conscientious about making sure that the boards were smooth and would not give splinters easily. My girls are pretty rough & tumble at times, and like most kids, don't just use their beds for sleeping!!!
Most of all David, thank you for voicing your concerns in a manner that is respectful! I really appreciate that after hearing so many assume that I went out of my way to cause as much harm to my tots as I possibly could. ;) I have no problems with people disagreeing with me, just be nice about it!!
Tanaya,
ReplyDeleteI think it's a great idea to make one in a larger size! My only caution/thought is that you might want to rethink how you re-enforce the base. I personally wouldn't trust a few bolts to hold up my husband & I! Perhaps building a frame out of 2 x 4s and attaching that to the base of the pallets? Also, the wheels might need to go and use 6 4 x 4 posts instead. . .??
I've given it a little bit of thought as you aren't the first to mention making it in a larger size. Perhaps I should draw up some tentative plans. . . .???
As for what else, A friend and I are contemplating a porch swing for her house and I'm needing a table for my newly opened up living room (just got new-to-me-furniture)to house some toys. I was thinking that might be a lovely spot to add a little pallet love.
However, at what point of pallet re-use does your house start to look like a scrap yard? If I find that point, I'll let you know!! :)
Send pics if you give the bed a try!!
so...i've been on an endless search of a nice trundle bed, and keep coming up with so much ugliness! do you think this could be made somehow to fit a trundle underneath? none of the daybeds i'm seeing can compete with how great yours is! help!!!
ReplyDeleteI would`nt mind this bed as an outsidebed in the garden.Perfect.
ReplyDeleteolá, tudo bom ?! Parabéns pelo post !
ReplyDeleteAqui no Brazil, em São Paulo, temos uma fábrica de paletes, e uma linha voltada para a fabricação de móveis de paletes. Visitem http://www.madeirausada.com.br . Abraços, Fábio
This is such an awesome idea. We were seriously just looking at what to do for our son. I think he's going to looooove this & I know my husband will have a blast making it.
ReplyDeleteThank you so much for sharing!!!!
:o)
This post may seem a little late but I saw this on design*sponge awhile back and I loved it! Don't listen to the negative comments, this is clever, creative and just gorgeous. I'm in the process of collecting enough heat-treated pallets to attempt one of my own. Thanks for the tut, love your blog!
ReplyDeleteI'm planning on making a pallet bed for my son soon and was wondering, what size size casters you used. Thanks :)
ReplyDeleteI will probably tell my wife that I am going to make this for our kid. This is lovely! Thanks.
ReplyDeletei for one am absolutely crazy about this idea and can not even begin to believe some of the grief you are getting from such an amazingly special, homemade bed made with love. We are moving in to a new loft next month and simultaneously, my daughter is turning 2 and graduating to a big girl bed. My husband and I are gonna tackle this project as a gift to her (and sand the edges very well of course :)) my question is, what size mattress does this bed fit Single? Twin? Maybe they are the same size and I just don't know. Thanks so much for sharing this wonderfully creative project. Will send pics your way when we're finished.
ReplyDeleteI like the trundle idea too for sleepovers and such. What about under-bed storage? I would think for a twin-queen for teens/adults having a bin on smaller casters to match could look cute. I don't know the first place to start looking for safely handled/constructed pallets but I think your bed looks great. Nice job! (Found this reposted through Prudent Baby :) )
ReplyDeleteI love this idea! After you made your numerous trips to get the supplies, about how long did it take to make this?
ReplyDeleteWow. they are beautiful! great job on putting these together..and in a very "mom-conscious" way ;-) You really took the time to do it right. Love the girls' room, btw. Did I mention, beautiful?! haha!
ReplyDeleteHi ! Do you know how to make sure that your own content is unique in the Internet and no one is using it without making sure you know about it?
ReplyDeleteHey there ! What a terrific looking blog you have! Did you make this blog by yourself?
ReplyDeleteThank You and I have a super offer: How Much Home Renovation Cost residential renovation contractors near me
ReplyDelete