This blog is no longer active. All content from this blog has been moved to my new website: LoriDanelle.com. To view this post on the new site, click here.
*********************************************************************************************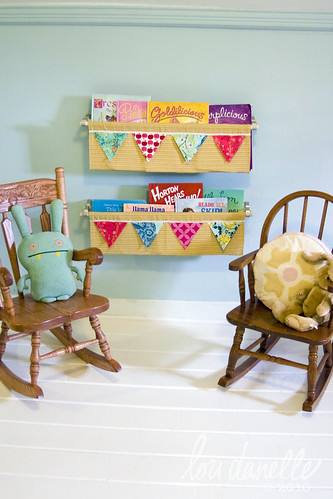
The hanging bookcase is not an idea that originated with me. Too bad, because it's really quite brilliant!! :) If you do a web search you'll find a few different ways to do it if you don't care for how I went about it.
I knew I would have little girls pulling on this, so I made sure that it would be very sturdy from the start. To achieve this, I used some upholstery I had on hand from previous project to make the baskets. I knew I would need to screw the double curtain rod brackets directly into a stud in the wall and that I couldn't trust wall anchors with my little girls. I found the studs in the basic location I would be hanging it and measured how far apart they were, center to center.

In newer houses, building codes specify that studs be spaced 16 inches apart from center to center. In older houses, I've discovered that pretty much anything goes. :) To find studs, you can use a stud finder, available at your local hardware store, or if you live in an older house like ours, it may be painfully obvious! Just look for the bowing in the sheet-rock and the nails popping out!! (OK, it's not that bad, but I can still tell where they are if I look closely.) Either way, I would use the 16" rule as an estimate, but double check by actually finding the studs.
This measurement tells me where I am going to put my hardware. The distance between—inside edge of one bracket, to inside edge of the other—gave me the width I needed to make my fabric basket.
To start, cut a rectangle 20" high x 24.25"wide.
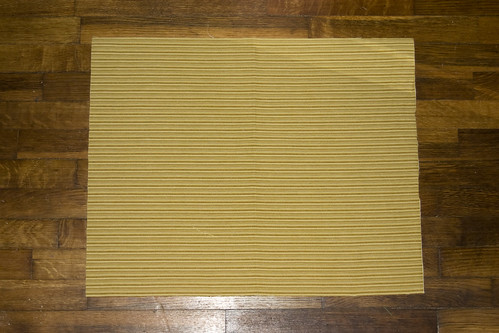
Serge, or zig-zag around all the edges to keep the seams from fraying.
Fold, iron & pin both side seams in 1/2" towards the wrong side of the fabric.
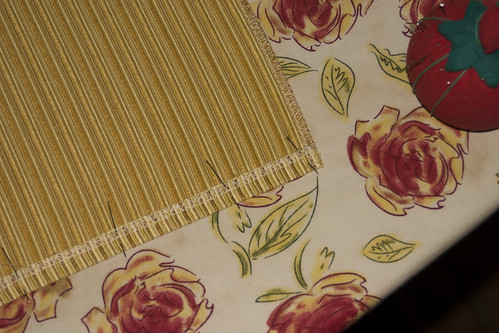
Sew along folded edge approximately 1/4" away from edge. For aesthetic purposes, I did 2 rows of stitching.

On the top & bottom edges, fold, iron & pin seams in 2" towards the wrong side of the fabric (same direction as the side seams).
Sew along the folded edges 1.5" away from the edge. Again, for aesthetic purposes and a little extra strength, I sewed 2 rows of stitches. This will create the channel that you will feed the 1/2" dowel through.

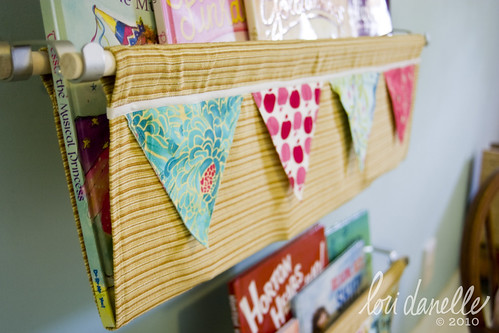
I wanted to tie in the bunting that I had made to hang over the girls' beds in these book shelves, so I added it to the fronts.
Use the same 1/4" bias tape that you used for your bunting.
Unfold it and pin in place, so that the folded edge is closest to the top of your hanging basket. For a guide, I lined the fold of my bias tape up with the top row of stitching on the basket. Stitch in place, leaving the top half of the tape free.

Arrange the triangles as you would like them, matching the top edge of the triangle to the inside fold of the bias tape, sandwiching it between the top and bottom of the bias tape. Pin in place.
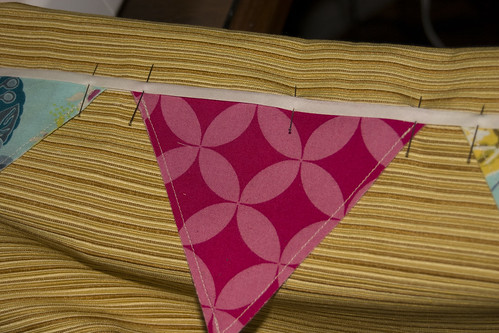
Sew 1/8" inch from the open edge of the bias tape.

Now all you have to do is insert your 1/2" wooden dowels and your basket is ready to hang and fill with books!
xoxo Lori Danelle
Great idea!
ReplyDeleteI like that! I like the bunting attached to the front too.
ReplyDeleteI love your bookshelves! I can tell you have girls because I noticed all the pinkalicious books; we have them too! I actually just ordered the goldilicious one last week! Ha! :)
ReplyDeleteGreat tutorial as always! I love these shelves.
ReplyDeleteThis is awesome!!
ReplyDeleteWhere do I find the brackets?
ReplyDeleteI purchased the brackets I used at Joann's, but I believe I pulled the image of the ones I recommend from the Home Depot website. Most home improvement stores should carry them in the section with window treatment hardware.
ReplyDeleteIkea has those brackets for $2.99 a pair. http://www.ikea.com/us/en/catalog/products/50079350
ReplyDeletethis is awesome. I need to do this!
ReplyDeleteThese are great! I love the addition of the pennant banner.
ReplyDeleteFYI: I wrote the original tutorial that was featured on Ohdeedoh a couple of years ago. If any of your readers want to see my instructions and some photos of book slings that have been made following them, take a look here:
http://pennycarnival.typepad.com/penny_carnival/2009/02/tutorial-hanging-book-display.html
Oops. Let me try making that link work:
ReplyDeletehttp://pennycarnival.typepad.com/penny_carnival/2009/02/tutorial-hanging-book-display.html
I LOVED your book sling and featured it here. So clever!
ReplyDelete